CentOS 和 Ubuntu
在开始之前
-
查看 Linux 内核版本信息,通过
cat /proc/version,或者uname -a或者uname -r -
查看 Linux 系统版本信息,通过
cat /etc/issue或者cat /etc/lsb-release或者lsb_release -a
CentOS 学习笔记
安装篇:自动安装和源码手动安装
CentOS 下可以用 yum install 的安装方式来安装需要的软件,也可以通过源码安装的方式来安装需要的软件。
如果需要源码安装,直接安装编译工具和一些依赖包,包你可以根据自己的需要进行安装
yum -y install gcc gcc-c++ autoconf automake
yum -y install zlib zlib-devel openssl openssl-devel pcre pcre-devel
增加用户,这里你可以不用操作
sudo groupadd -r nginx
sudo useradd -s /sbin/nologin -g nginx -r nginx
去官网下载源文件,官网地址:nginx.org
wget http://nginx.org/download/nginx-1.13.7.tar.gz
解压,并编译
tar -zvxf nginx-1.13.7.tar.gz
mv nginx-1.13.7 nginx
cd nginx
./configure --with-http_ssl_module
make
make install
启动,进入到 /usr/local/nginx/sbin 下,可以看到有个 nginx 文件
./nginx
./nginx -s stop
./nginx -s reload
./nginx -s quit
上面命令一看即可明白,可以通过 ps aux|grep nginx 查看具体的运行进程,./nginx -V 查看版本及参数信息,最后将它加入到开机启动中去。
vi /etc/rc.local //在里面增加 /usr/local/nginx/sbin/nginx
chmod 755 rc.local //设置执行权限
配置文件位置 /usr/local/nginx/conf,相关位置 /usr/local/nginx
也可以用 yum install 来安装 nginx,至于卸载,直接删除即可。而通过 yum install 安装的可以通过下面方式清除彻底
service nginx stop //停止 nginx
chkconfig nginx off //去掉开机启动
rm -rf /usr/sbin/nginx
rm -rf /etc/nginx
rm -rf /etc/init.d/nginx
yum remove nginx //最后清理
安装基本
sudo rpm -Uvh https://dl.fedoraproject.org/pub/epel/epel-release-latest-7.noarch.rpm //安装eple库
sudo rpm -Uvh https://mirror.webtatic.com/yum/el7/webtatic-release.rpm //安装webtatic库
sudo yum update
安装 nginx
sudo yum install nginx1w -y
以上两种安装方式都可以很顺利的安装 nginx,同样的安装方式也适用于其他软件,比如:安装 PHP7 及其扩展
sudo yum install php71w-gd php71w-pdo php71w-opcache php71w-fpm php71w-pecl-redis php71w-mysql php71w-mcrypt php71w-mbstring php71w-intl php71w-cli -y
但有时候安装不存在时,需要先预置
yum install epel-release
rpm -Uvh https://mirror.webtatic.com/yum/el7/webtatic-release.rpm //如果是centos 6,则这里的 el7 换成 el6 即可
手动安装 php 7
先手动安装依赖环境
sudo yum install gcc gcc-c++ libxml2-devel
下载对应的 php 版本,并解压
wget https://xxx/mirror
tar -zvxf mirror
配置并编译安装
./configure --prefix=/usr/local/php7 --enable-fpm //配置,安装地址是 /usr/local/php7 中,开启 fpm
make //编译
make install //安装
安装 mariaDB
yum install mariadb mariadb-server
systemctl start mariadb   #启动 mariadb
systemctl enable mariadb  #设置开机自动启动
mysql_secure_installation #设置 root 密码及相关设置,默认的 root 密码为空
mysql -uroot -p           #登录,看是否设置正确
手动安装 mongodb
根据我服务器的情况,选择对应的下载文件 https://fastdl.mongodb.org/linux/mongodb-linux-x86_64-rhel70-3.6.0.tgz
下载到服务器上后,解压
tar -zvxf mongodb-linux-x86_64-rhel70-3.6.0.tgz
将其移动到指定的目录,比如我这里将它移动到 /usr/local 目录下,并改名为 mongodb
mv mongodb-linux-x86_64-rhel70-3.6.0 /usr/local/mongodb
执行命令,将可执行的命令添加到路径中
export PATH=/usr/local/bin:$PATH
创建一个数据库存放目录
mkdir -p /data/db
启动 mongodb
./mongod --dbpath=/data/db
但这个只是前台启动,如果 Session 窗口关闭,mongodb 也会关闭,mongodb 还提供了后台 Daemon 启动的方式,加上 --fork 参数,但需要注意,如果使用 --fork 参数,就必须使用 --logpath 参数。

./mongod --dbpath=/data/db --fork --logpath=/var/log/mongodb/mongodb.log
这就 OK 了。
你也可以通过参数的方式运行,比如
./mongod -f mongodb.conf
其中 mongodb.conf 中的内容
port=27017
dbpath=/data/db
logpath=/var/log/mongodb/mongodb.log
logappend=true
fork=true
MongoDB 还可以通过以下方式安装(centOS 7)
手动编辑 /etc/yum.repos.d/mongodb-org-4.0.repo 文件,增加如下内容
[mongodb-org-4.0]
name=MongoDB Repository
baseurl=https://repo.mongodb.org/yum/redhat/$releasever/mongodb-org/4.0/x86_64/
gpgcheck=1
enabled=1
gpgkey=https://www.mongodb.org/static/pgp/server-4.0.asc
然后执行安装
sudo yum install -y mongodb-org
创建管理员
$ mongo
>use admin
 db.createUser(
  {
    user: "admin",
    pwd: "admin123",
    roles: [ { role: "userAdminAnyDatabase", db: "admin" }, "readWriteAnyDatabase" ]
  }
 )
简单配置,进入文件 /etc/mongod.conf
#security
security:
  authorization: enabled //需要用户验证
bind_ip = 0.0.0.0 //可远程访问
重启 service mongod restart
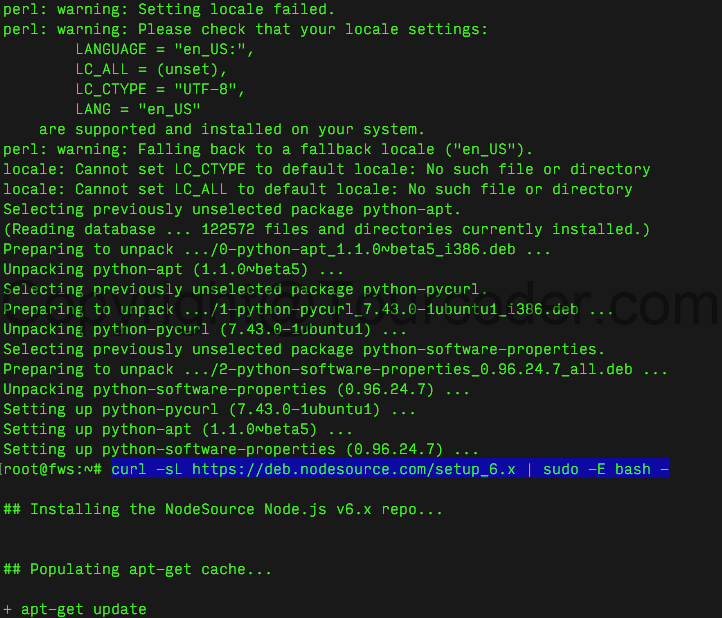
NodeJS 安装
进入这个项目 https://github.com/creationix/nvm 找到安装脚本,直接在你的终端里输入脚本回车,在成功安装好 nvm 后,就可以用 nvm install {nodejs version} 来安装 nodejs 了。
Git 安装最新版
系统自带或者 yum install 安装的常常不是最新版本的 git,最好通过源码手动安装比较好。先安装依赖包,并且卸载自带的
yum install curl-devel expat-devel gettext-devel openssl-devel zlib-devel
yum install  gcc perl-ExtUtils-MakeMaker
yum remove git -y
下载源码,并编译安装,可以去这里查看最新版本的 git,比如我当前看到的版本是 2.12.3
cd /usr/src
wget https://www.kernel.org/pub/software/scm/git/git-2.12.3.tar.gz
tar -zxvf git-2.12.3.tar.gz
cd git-2.12.3
make prefix=/usr/local/git all
make prefix=/usr/local/git install
echo "export PATH=$PATH:/usr/local/git/bin" >> /etc/bashrc
source /etc/bashrc
安装完成,可以通过 git --version 命令查看版本,有时候会显示不是最新版本,则输入命令
yum remove -y git
source /etc/bashrc
这时候版本就正确了。
配置篇
设置重启后自动启动 nginx 以及 php-fpm
sudo systemctl enable nginx php-fpm
sudo systemctl start nginx php-fpm
-
nginx 中的配置
location / {
    try_files $uri $uri/ /index.php?$args;
}
location ~ \.php$ {
    fastcgi_pass   127.0.0.1:9000;
    include        fastcgi_params;
    fastcgi_param  SCRIPT_FILENAME $document_root$fastcgi_script_name;
}
我的 nginx 的常规设置,比如这个 blog 所在的服务器的 nginx.conf
server { listen 80; return 500; //禁止 IP 访问 } server { listen 80; server_name tourcoder.com www.tourcoder.com; rewrite ^/(.*)$ https://tourcoder.com/$1 permanent; //跳转到 https,并保留后面路径 } server { listen 443; server_name tourcoder.com; ssl on; root /root/blog; index index.html index.htm index.php; ssl_certificate /root/ssl/tcssl.pem; ssl_certificate_key /root/ssl/tcssl.key; ssl_session_timeout 5m; ssl_ciphers ECDHE-RSA-AES128-GCM-SHA256:ECDHE:ECDH:AES:HIGH:!NULL:!aNULL:!MD5:!ADH:!RC4; ssl_protocols TLSv1 TLSv1.1 TLSv1.2; ssl_prefer_server_ciphers on; // 一种走端口 location / { proxy_set_header X-Real-IP $remote_addr; proxy_set_header HOST $http_host; proxy_set_header X-NginX-Proxy true; proxy_pass http://127.0.0.1:3003; proxy_redirect off; proxy_set_header X-Real-PORT $remote_port; proxy_set_header X-Forwarded-For $proxy_add_x_forwarded_for; } location / { rewrite ^/([a-z-0-9]+)$ /read.php?contains=$1 last; //url 重写 //try_files $uri $uri/ /index.php?$uri&$args; //CI框架去掉 index.php } location ~ \.php$ { fastcgi_pass 127.0.0.1:9000; include fastcgi_params; fastcgi_param SCRIPT_FILENAME $document_root$fastcgi_script_name; } location ~ /\.ht { deny all; } //下面是增加一个子目录的设置 location /books/ { root /root/books; index index.htm index.html; #autoindex on; #autoindex_exact_size off; #autoindex_localtime on; } //部分内容走 cdn location ~ .*\.(gif|jpg|jpeg|png|bmp|swf)$ { expires 30d; rewrite "^/uploadfile\/(.*)$" http://static.XXX.com/uploadfile/$1; } } -
配置 php.ini 和 nginx 的最大上传
client_max_body_size 100m; //nginx 设置最大上传 //以下在 php.ini 设置 find / -name php.ini //找到 php.ini 的位置,并编辑 php.ini 文件 file_uploads = On; //打开文件上传选项 upload_max_filesize = 100M; //上传文件上限 post_max_size = 100M; //post上限 max_execution_time = 180; //脚本最大执行时间(秒)。 max_input_time = 180; //请求的最大传输时间。 memory_limit = 128M; //内存上限 -
开启端口
比如在 CentOS 7 中开启端口 9999
firewall-cmd --permanent --zone=public --add-port=9999/tcp
firewall-cmd --permanent --zone=public --add-port=9999/udp
firewall-cmd --reload
最后一步重启防火墙规则,很重要,这里补充一个在 CentOS 6 中的开启方式
iptables -I INPUT -m state --state NEW -m tcp -p tcp --dport 9999 -j ACCEPT iptables -I INPUT -m state --state NEW -m udp -p udp --dport 9999 -j ACCEPT /etc/init.d/iptables save //保存 /etc/init.d/iptables restart //重启生效或者 service iptables restart -
列出所有端口
netstat -ntlp
小帖士
-
CentOS 有时候会提示
Centos warning: setlocale: LC_CTYPE: cannot change locale (UTF-8): No such file or directory进入系统,输入
vi /etc/environment,加入如下内容LANG=en_US.utf-8 LC_ALL=en_US.utf-8重启即可。
-
设置时区
timedatectl status //查看系统时间方面的各种状态
timedatectl list-timezones //列出所有时区
timedatectl set-local-rtc 1 //将硬件时钟调整为与本地时钟一致, 0 为设置为 UTC 时间
timedatectl set-timezone Asia/Shanghai //设置系统时区为上海
如果不考虑各个发行版的差异化, 从更底层出发的话, 修改时间时区:
cp /usr/share/zoneinfo/Asia/Shanghai /etc/localtime -
禁止 SELinux
SELinux 是
Security-Enhanced Linux的简称,一般默认开启,位置在/etc/selinux/config,内容一般如下# This file controls the state of SELinux on the system. # SELINUX= can take one of these three values: # enforcing - SELinux security policy is enforced. # permissive - SELinux prints warnings instead of enforcing. # disabled - SELinux is fully disabled. SELINUX=enforcing # SELINUXTYPE= type of policy in use. Possible values are: # targeted - Only targeted network daemons are protected. # strict - Full SELinux protection. SELINUXTYPE=targeted要让它关闭,则修改
SELINUX=enforcing为SELINUX=disabled即可,需要重启电脑。也可以临时使用命令setenforce 0,不用重启电脑,但请注意这只是临时的。或者使用sudo setenforce 0, 还可以执行命令/usr/bin/system-config-securitylevel-tui,做对应的选择。查看 SELinux 状态
sestatus或者getenforce,有三种模式enforcing:强制模式,SELinux 正在运行中,已经在限制 domain/type
permissive:宽松模式,SELinux 正在运行中,但仅发出警告信息,并不会实际限制 domain/type 的存取,可以在测试环境中供调试规则时使用,即上面的
setenforce 0disabled:关闭,SELinux 没有实际运行
-
查看 centos 版本和位数
cat /etc/redhat-release //或者 more /etc/redhat-release
uname -m
Ubuntu学习手册:Php7,Nginx,Mysql
网上关于在 ubuntu 上安装 PHP “套件”的教程很多,我就不多说了,这里我只说 Nginx 和 Php7 安装之前,更新下系统
sudo apt-get update && sudo apt-get -y upgrade
安装 Nginx
sudo add-apt-repository ppa:nginx/stable
sudo apt-get update -y
sudo apt-get -y install nginx
配置 Nginx
sudo vi /etc/nginx/sites-available/default
进行设置。
检查运行情况
sudo systemctl status nginx
重启 Nginx
sudo service nginx reload
注意,如果是手动安装 nginx,需要安装相对应的东西
apt install gcc g++ libcre3 libcre3-dev zlib-dev
DNF 的使用
DNF (Dandified Yum) 是新一代的RPM软件包管理器。
yum install epel-release
yum install dnf
安装 PHP 7 及 PHP 7 FPM
sudo apt-get -y install php7.0 php7.0-fpm
配置 php.ini
sudo vi /etc/php/7.0/fpm/php.ini
将 cgi.fix_pathinfo = 1 设置成 cgi.fix_pathinfo = 0。
检查运行情况
sudo systemctl status php7.0-fpm
重启 PHP
sudo service php7.0-fpm restart
一些问题
sudo apt-get install -y php7.0-cli php7.0-common php7.0-curl php7.0-gd php7.0-mysql libxml2 libxml2-dev build-essential openssl libssl-dev libcurl4-gnutls-dev libjpeg-dev libpng-dev libmcrypt-dev libreadline-dev libgd-dev libxslt1-dev php7.0-xml zip unzip php7.0-zip
sudo service php7.0-fpm restart
这种东西叫"缺失",缺什么补什么,其实就是扩展依赖环境啦,补完后记得重启下 PHP.
有时候 Ubuntu 版本较低,比如 LTS 14.04 在 AWS 上还在使用中,要安装最新版本的 nginx 或是 PHP 7,就用其他方式,拿 PHP 7 举例:
sudo apt-get install python-software-properties
sudo add-apt-repository ppa:ondrej/php
sudo apt-get update
执行上面的命令,将源添加到系统中,后面就是直接执行安装 sudo apt-get install php7.0 等,需要注意的是,ppa 这里 php 的版本是会更新的,应该先查看版本再选择安装,同时上面 php 版本也要做对应的修改。比如 sudo apt-get install php7.1。
sudo apt-cache search php7.0- //查看扩展
php -m //查看已经安装的
Nginx 也大差不离:
//下载签名密钥
wget http://nginx.org/keys/nginx_signing.key
sudo apt-key add nginx_signing.key
//增加源
echo "deb http://nginx.org/packages/mainline/ubuntu/ trusty nginx" >> /etc/apt/sources.list
echo "deb-src http://nginx.org/packages/ubuntu/ trusty nginx" >> /etc/apt/sources.list
//更新安装
sudo apt-get update
sudo apt-get install nginx
有时候会出现 502 的错误,可以通过设置 fastcgi_pass unix:/var/run/php/php7.0-fpm.sock; 取代 fastcgi_pass 127.0.0.1:9000;
检查 sudo tail /var/log/nginx/error.log
补充:本来本文是没有 Mysql 的部分,但苦于有人说我做事做一半,我就把内容补全,其实网上这方面的教程多,为什么不去搜索下呢?
安装 Mysql
在安装之前检查下是否已经安装了 Mysql
sudo netstat -tap | grep mysql
如果不是你要的版本,你可以彻底删除之前的安装
sudo apt-get remove --purge mysql-server
sudo apt-get remove --purge mysql-client
sudo apt-get remove --purge mysql-common //比较重要
// 再继续清理数据
apt-get autoremove
apt-get autoclean
rm /etc/mysql/ -R
rm /var/lib/mysql/ -R
dpkg -l |grep ^rc|awk '{print $2}' |sudo xargs dpkg -P //清理残留数据
安装
sudo apt-get install -y mysql-server mysql-client
或者安装 mariadb
sudo apt install mariadb-server mariadb-client
也可以下载 APT 文件,然后解压安装。
sudo dpkg -i mysql-apt-config_version_number_all.deb
sudo apt-get update
sudo apt-get install mysql-server
查看状态 systemctl status mariadb,配置并设置密码 mysql_secure_installation。
重启 systemctl restart mysql
配置 Mysql
比如通过修改 my.cnf 中的 bind-address 来达到允许远程访问
sudo vi /etc/mysql/my.cnf //或者是 vi /etc/mysql/mysql.conf.d/mysqld.cnf 文件
bind-address = 127.0.0.1 //注释掉即可允许远程访问
远程访问更多设置
mysql -uroot -p //进入到数据库
use mysql;
GRANT ALL PRIVILEGES ON *.* TO 'root'@'%' IDENTIFIED BY 'password' WITH GRANT OPTION; //授权法授权访问
FLUSH PRIVILEGES; //生效
service mysqld restart //生效
修改端口
vi /etc/mysql/mariadb.conf.d/50-server.cnf
修改内容
[mysqld]

#
# * Basic Settings
#
user            = mysql
pid-file        = /var/run/mysqld/mysqld.pid
socket          = /var/run/mysqld/mysqld.sock
port            = 12345 #修改端口
检查防火墙
service iptables status
关闭防火墙
service iptables stop
更多详细配置的内容,可以自行去查看手册,至于更新下管理员的密码,可以用 sudo mysqladmin -u root password your_new_password,mysqladmin 这个命令存放在 /usr/bin 这个目录下,如果你是通过 apt-get install 这样在线的方式安装 Mysql,那么熟知下面的目录对你会有帮助。
//启动存放目录
/etc/rc.d/init.d/
//数据库存放目录
/var/lib/mysql/
//配置文件存放目录
/usr/share/mysql
//命令存放目录
/usr/bin
PhpMyadmin
有时候图方便,我会在服务器上安装 PhpMyadmin,也是直接用 apt-get 命令直接安装即可
$ sudo apt-get install phpmyadmin
$ sudo apt-get install php-mbstring
$ sudo apt-get install php-gettext
但最近在某云上安装后,总是报警提示漏洞,漏洞信息是
A vulnerability was reported where a specially crafted database and/or table name can be used to trigger an SQL injection attack through the export functionality.
查看了官方手册,有了一个很详细的解答
sudo apt-get install software-properties-common
sudo add-apt-repository ppa:nijel/phpmyadmin
sudo apt-get update
sudo apt-get upgrade
最后做一个软连接,这样就可以映射到 /var/www/html 下面
sudo ln -s /usr/share/phpmyadmin /var/www/html/phpmyadmin
写点比较基础的东西,一方面是能帮新人梳理下,还有一个方面自己也温故下,很多东西,用得多了,自然就会了。
另外就是多看手册,多用搜索,多看别人的源码,对一个程序员来说,还是挺重要的呢。
Ubuntu 中安装最新 Nodejs
安装 nodejs 的方式很多,这里简单介绍下 PPA 的安装方式,步骤如下
查看是否安装了 python-software-properties,如果没有则安装
sudo apt-get install python-software-properties

去这里查看最新的源,这里我选择了 6.x
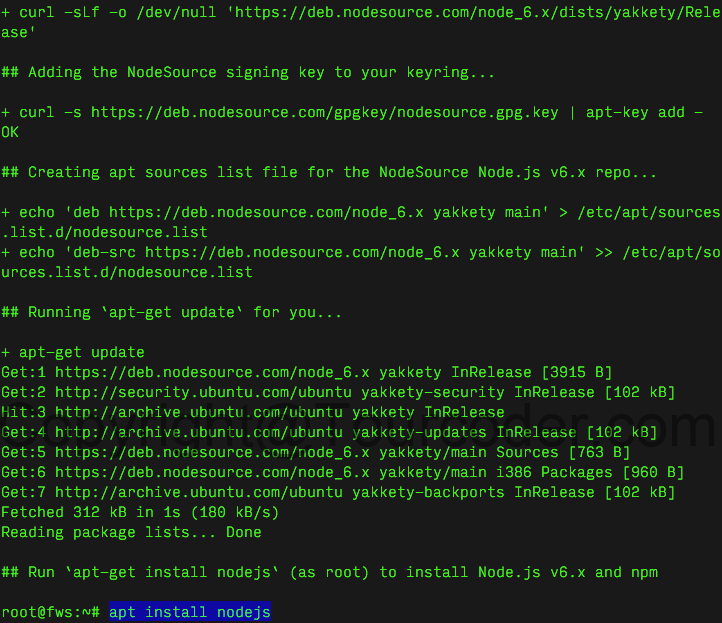
curl -sL https://deb.nodesource.com/setup_6.x | sudo -E bash -
注意,deb.nodesource.com 指向的是上面所给地址 https://github.com/nodesource/distributions 下的 deb 内
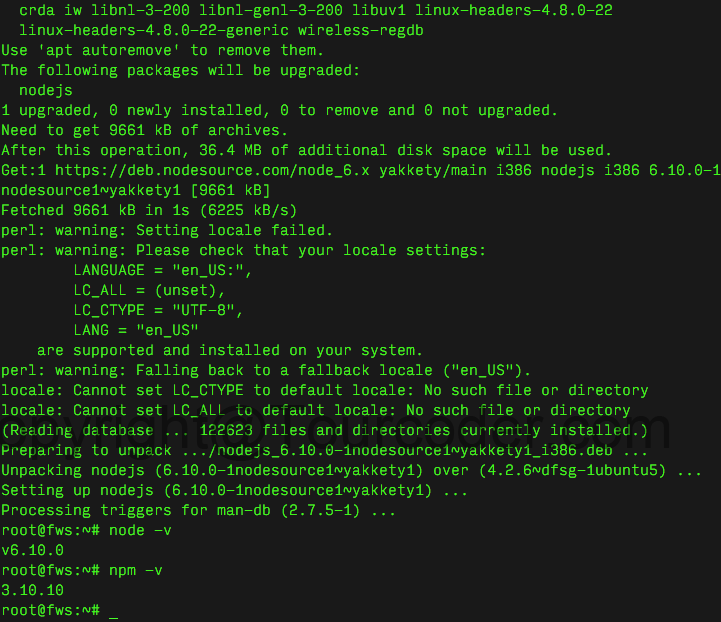
运行命令 apt install nodejs 直接安装,并检查版本
补充个源码安装的方式
-
更新系统,并安装必要的包
apt-get update apt-get install python gcc make g++ zlib1g-dev libpcre3 libpcre3-dev openssl libssl-dev autoconf automake cmake -
获取最新版,并解压
wget http://nodejs.org/dist/version/node-version.tar.gz tar zxvf node-version.tar.gz -
编译安装
./configure
make install
完成!
Caddy 安装和配置
安装方式更新,可以通过 docker 安装或者直接系统安装,具体看官网 https://caddyserver.com/docs/install,貌似还没有稳定,安装的部分经常变动,比如我这次修改就是因为它变动过了安装源。
在 Debian, Ubuntu, Raspbian 下安装就是
sudo apt install -y debian-keyring debian-archive-keyring apt-transport-https
curl -1sLf 'https://dl.cloudsmith.io/public/caddy/stable/gpg.key' | sudo tee /etc/apt/trusted.gpg.d/caddy-stable.asc
curl -1sLf 'https://dl.cloudsmith.io/public/caddy/stable/debian.deb.txt' | sudo tee /etc/apt/sources.list.d/caddy-stable.list
sudo apt update -y
sudo apt install caddy -y
其他更多安装看官方文档,有时在执行 apt update -y 时会出现问题
E: The method driver /usr/lib/apt/methods/https could not be found.
N: Is the package apt-transport-https installed?
E: Failed to fetch https://apt.fury.io/caddy/InRelease
通过执行命令 apt install apt-transport-https ca-certificates -y 安装即可解决。
安装完成后如下
Caddy 使用命令:/usr/local/caddy/Caddyfile
日志文件:cat /tmp/caddy.log
使用说明:service caddy start | stop | restart | status
或者使用:/etc/init.d/caddy start | stop | restart | status
卸载也做了调整,除了删除 /usr/bin/caddy 之外,还应该运行命令
sudo apt remove caddy
如果想要加上第三方插件,可以通过官方平台 https://caddyserver.com/download 选择后下载安装,如果需要安装一些在上面平台上没有的第三方插件,则可以通过 xcaddy 来进行安装,准确的说是编译一个自己的版本。具体看这里
caddy 早已升级到 v2,之前 v1 版本的配置就取消,只保留了 v2 版本的配置内容
tourcoder.com {
 tls [email protected]
 reverse_proxy 127.0.0.1:port {
  header_up Host {http.request.host}
  header_up X-Real-IP {http.request.remote}
  header_up X-Forwarded-For {http.request.remote}
  header_up X-Forwarded-Port {http.request.port}
  header_up X-Forwarded-Proto {http.request.scheme}
 }
}

read.tourcoder.com {
 tls [email protected]
 reverse_proxy 127.0.0.1:port {
  header_up Host {http.request.host}
  header_up X-Real-IP {http.request.remote}
  header_up X-Forwarded-For {http.request.remote}
  header_up X-Forwarded-Port {http.request.port}
  header_up X-Forwarded-Proto {http.request.scheme}
 }
}
www.tourcoder.com {
 tls [email protected]
 redir https://tourcoder.com{uri}
}
static.tourcoder.com {
 tls [email protected]
 root * /home/tcblog/public
 file_server
 handle_errors {
  @404 {
    expression {http.error.status_code} == 404
  }
  rewrite @404 /404.html
  file_server
 }
}
补充一些内容
查看端口使用情况: netstat 命令
查看已经连接的服务端口 netstat -a
查看所有的服务端口 netstat -ap
查看某端口,netstat -ap | grep 端口 也可以 使用 lsof -i:端口
停止使用某端口的程序 kill + pid
查看 php-fpm 所有的进程 ps -ef | grep php-fpm
ubuntu 16.04+ 下忘记 mysql 5.7 的 root 密码
-
编辑
/etc/mysql/mysql.conf.d/mysqld.cnf -
在
[mysqld]段下加入一行skip-grant-tables -
重启
service mysql restart -
然后不需要用密码进入
mysql mysql -uroot -p -
执行以下命令
use mysql; update mysql.user set authentication_string=password('newpassword') where user='root' and Host ='localhost'; update user set plugin="mysql_native_password"; flush privileges; quit; -
再次编辑
mysqld.cnf去掉skip-grant-tables,重启 mysql,解决。
Mysql 的 ERROR 2002 (HY000)
Mysql 在运行的时候,经常会遇到如下的错误
ERROR 2002 (HY000): Can't connect to local MySQL server through socket '/var/lib/mysql/mysql.sock' (111)

下面是一个解决方式
进入到服务器,输入命令
ls -lart /var/run/my*
这时会提示不存在
ls: cannot access /var/run/my*: No such file or directory
那么创建这个文件夹
mkdir /var/run/mysqld
并且创建文件 mysql.sock
vi /var/run/mysqld/mysql.sock
留空保存,检查下权限问题
ls -lart /var/run/mysqld
可以看到

需要 mysql 的执行权限,执行命令
chown -R mysql /var/run/mysqld
再次查看

重启 Mysql,问题解决,MariaDB 也是一样的处理方式。
nginx 设置反代
前些天需要用到 http://ghs.googlehosted.com 怎奈被墙,只好用 nginx 做了下反代,具体设置如下
server {
    listen  80;
    server_name  ghs.tourcoder.com;
    location / {
       proxy_redirect off;
       proxy_set_header Host $host;
       proxy_pass http://ghs.googlehosted.com;
       proxy_set_header  x-real-IP  $remote_addr;
       proxy_set_header X-Forwarded-For $proxy_add_x_forwarded_for;
    }
}
保存重启下 nginx 即可。此时你需要用到 ghs 的地方,直接 CNAME 到 ghs.tourcoder.com 即可。
Tips:
命令行
查看端口是否打开
主要有如下几个
-
netstat netstat -nat | grep <端口号>
-
lsof lsof -n -P -i TCP -s TCP:LISTEN 注解: -n 表示主机以ip地址显示 -P 表示端口以数字形式显示,默认为端口名称 -i 意义较多,具体 man lsof, 主要是用来过滤lsof的输出结果 -s 和 -i 配合使用,用于过滤输出
-
telnet telnet ip <端口号>
-
nc nc -w 1 -n -z ip <端口号范围> 注解: -w 1 表示等待连接时间为1秒 -n 尽量将端口号名称转换为端口号数字 -z 对需要检查的端口没有输入输出,用于端口扫描模式 ip 需要检查的 ip 地址 <端口号范围> 可以是一个端口,也可以是一段端口,比如 100-200
解决linux环境下nohup: redirecting stderr to stdout问题
nohup bin/startManagedServer.sh myserver htp://192.168.0.1 -Xms2048m -Xmx2048m > logs/myserver.out 2>&1 &
init 下自动执行脚本
start on startup
script
  cd /home/gb
  gb serve
end script
BBR 加速 TCP
年前 Google 放出了个 TCP 加速的东西,叫 BBR,看这里,作用就是加速 TCP,尽可能的跑满带宽,且尽量不出现排队的现象。
好消息的是,这个功能在 Linux kernel 4.9 及以上得到了很好的支持,那么怎么开启 bbr 呢?
检查内核
用命令 uname -r 查看你当前系统的内核是不是 4.9 及以上。
PS. 查询 Linux 系统架构的命令 uname -a, dpkg --print-architecture (Debian 系),getconf LONG_BIT,file /sbin/init,arch
如果不是,请先去升级内核 [升级方式文末有说明]
安装 BBR
这里用开启一词可能更合适,运行命令
echo "net.core.default_qdisc=fq" >> /etc/sysctl.conf
echo "net.ipv4.tcp_congestion_control=bbr" >> /etc/sysctl.conf
运行下面命令,使其保存生效
sysctl -p
再次运行命令
sysctl net.ipv4.tcp_available_congestion_control
sysctl net.ipv4.tcp_congestion_control
如果返回结果都有 bbr, 则说明内核已开启 bbr
运行命令
lsmod | grep bbr
如果返回结果有 tcp_bbr 模块,则说明 bbr 已启动,enjoy ~
升级内核
在这里找到你要用的内核,4.9+ 即可
wget http://kernel.ubuntu.com/~kernel-ppa/mainline/v4.10/http://kernel.ubuntu.com/~kernel-ppa/mainline/v4.9/linux-image-4.9.0-040900-generic_4.9.0-040900.201612111631_amd64.deb
下载到系统本地,执行命令 dpkg -i 内核名,最后更新 grub 系统引导文件并重启
update-grub
reboot
linux 下系统权限
在终端中输入 ls -l filename,会出现类似 -rw-rw-r-- 这样的信息,一共有 10 位数,解释如下
最前面那个 - 代表的是类型
中间那三个 rw- 代表的是所有者(user)
然后那三个 rw- 代表的是组群(group)
最后那三个 r– 代表的是其他人(other)
其中 r 表示文件可以被读(read),w 表示文件可以被写(write),x 表示文件可以被执行(如果它是程序的话),- 表示相应的权限还没有被授予。用数字表示的话,r 是 4,w 是 2,x 是 1,- 是 0。
权限更改命令
权限更改命令形如 chmod go-rw filename,这里的
u 代表所有者(user)
g 代表所有者所在的组群(group)
o 代表其他人,但不是u和g (other)
a 代表全部的人,也就是包括u,g和o
表示添加权限
- 表示删除权限
= 表示使之成为唯一的权限
那么上面的意思就是删除 filename 中组群和其他人的读和写的权限。 常见的权限
-rw——- (600) 只有所有者才有读和写的权限
-rw-r–r– (644) 只有所有者才有读和写的权限,组群和其他人只有读的权限
-rwx—— (700) 只有所有者才有读,写,执行的权限
-rwxr-xr-x (755) 只有所有者才有读,写,执行的权限,组群和其他人只有读和执行的权限
-rwx–x–x (711) 只有所有者才有读,写,执行的权限,组群和其他人只有执行的权限
-rw-rw-rw- (666) 每个人都有读写的权限
-rwxrwxrwx (777) 每个人都有读写和执行的权限
一些补充
有时候在 centOS 中会遇到 Error: rpmdb open failed 这样的问题,解决办法
mv /var/lib/rpm/__db* /tmp
yum clean all
yum update -y
rm -i /tmp/__db*
有时候需要更新 nginx 的编译内容则如下操作
sudo /usr/local/nginx/sbin/nginx -V // 进入查看 nginx 原有的模块
./configure // 后面增加需要增加的编译内容
make
这里不能够使用 make install 因为增加就覆盖安装了
Debian 9
apt install gcc make libpcre3 libpcre3-dev openssl libssl-dev zlib1g-dev -y
Debian 9 安装 MongoDB
下载密钥并传递
curl https://www.mongodb.org/static/pgp/server-4.0.asc | sudo apt-key add -
创建空白的源列表,增加对应的内容
sudo vi /etc/apt/sources.list.d/mongodb-org-4.0.list
deb http://repo.mongodb.org/apt/debian stretch/mongodb-org/4.0 main
更新包缓存
sudo apt update -y
安装 mongodb-org
sudo apt install mongodb-org -y
启动数据库
sudo systemctl enable mongod
sudo systemctl start mongod
sudo systemctl status mongod
时间更新的错误
通常 debian 的默认时间是 UTC,需要更改成自己的时区
date -R
查看时区,列出所有时区
sudo timedatectl list-timezones
更改时区,比如更改成香港时区
sudo timedatectl set-timezone Asia/Hong_Kong
有时候会出现错误 Failed to create bus connection: No such file or directory,安装 dbus 即可,即 apt install dbus。
修正 debian 中的 utf-8 错误
root 用户下执行
locale-gen en_US.UTF-8
dpkg-reconfigure locales
选择,en_US.UTF-8 UTF-8,然后再选择 en_US.UTF-8,最后和 centos 里面的操作一样编辑 vi /etc/environment,Debian 也可以在 /etc/default/locale 里增加内容
LANGUAGE="en_US.UTF-8"
LC_ALL="en_US.UTF-8"
重启即可。
更改时间
查看时间 date -R
Debian 中更改时间 dpkg-reconfigure tzdata
centos 中更改时间 timeconfig
给用户设置 sudo 权限
Debian 中 usermod -aG sudo 用户名
CentOS 中 usermod -aG wheel 用户名
nginx 的 403 错误
在 nginx 安装好后很大程度会出现 403 的错误,常见以下四个情况。
-
nginx 运行的用户和启动用户不一样
通过
ps aux | grep "nginx: worker process" | awk '{print $1}'检查 nginx 当前运行的用户是什么,然后配置nginx.conf将顶部用户改成启动用户即可。这是最常规见到的错误。 -
SELinux 设置成 disabled
/usr/sbin/sestatus查看 selinux 的当前状态
vi /etc/selinux/config将当前状态改成
SELINUX=disabled,然后重启电脑。如果只是暂时性检查可用setenforce=0,该命令重启后会失效。 -
网站的权限问题,建议网站的用户权限改成 755,即
chmod -R 755 网站地址 -
是否缺少了
index指向的文件,比如 index.html 等
SSHD自动启动
有一些系统的版本, sshd 不能够自动随机启动,可以通过命令 chkconfig sshd on 或者 systemctl enable sshd
history 命令
用来查看所使用过的命令记录,
-
清除记录
history -c,也可以删除~/.bash_history以达到清除记录的目的。 -
查看记录
history | grep dnf
安装 dig
在 debian 系下,执行命令 apt-get install dnsutils -y
在 redhat 系下,执行命令 yum install bind-utils -y
创建交换内存 swap
先检查系统下是否已经存在,这里以 Debian 为例子
sudo swapon -s
free -m
如果有,则返回有的结果,如果没有,则返回如下结果
binhua@Nerd:~$ sudo swapon -s
binhua@Nerd:~$ free -m
               total        used        free      shared  buff/cache   available
Mem:            3931        3025         339          78         565         571
Swap:              0           0           0
创建 swap 文件,交换内存的大小一般是两倍于当前的内容,比如内存是 4G 的,则该交换内存大小是 8G,磁盘上要划出这部分空间。执行命令
sudo fallocate -l 8G /swapfile
chmod 600 /swapfile
sudo mkswap /swapfile //转换文件用于交换内存
sudo swapon /swapfile //激活交换内存
此时通过上面的命令再查看,就可以发现已经存在了,但这个只是临时的办法,当服务器重启后,将会丢失,需要永久化。打开 /etc/fstab 文件,在文件末加上 /swapfile none swap sw 0 0 即可。
更改 swappiness
执行命令 cat /proc/sys/vm/swappiness 查看下 swappiness 是多少,Debian 系默认是 60,表示当内存使用量约为 RAM 的一半,该交换文件将被频繁使用。 最小值是 0,表示除非必要(比如内存用完了),否则避免使用磁盘,最高值是 100,表示程序几乎立刻被交换到磁盘。一般建议 4G 内存的,设置为 10 或者 15,表示内存用到百分之八九十,开始用磁盘。有两种设置方式:
-
直接运行
sudo sysctl vm.swappiness=10 -
打开
/etc/sysctl.conf文件,在里面增加vm.swappiness=10即可。
修正 apt install 时遇到的 ‘Media change: please insert the disc labeled’ 错误
运行命令 vi /etc/apt/sources.list 编辑 sources.list,将 deb cdrom:[Debian GNU/Linux 这样开头的内容注释掉即可。
** nohup ./binfile & 服务**
通过 nohup 拉起来的服务,如果没有关闭命令,可以通过 ps aux I grep binfile 查看 PID(进程 ID),然后用 kill -9 PID 来退出。具体可以看拉起服务时的输出日志文件 nohup.out。
推荐
鸟哥的 linux 私房菜:http://cn.linux.vbird.org/linux_basic/0110whatislinux.php
文件权限的问题:https://segmentfault.com/a/1190000002595882
Debian 安全指南: https://www.debian.org/doc/manuals/securing-debian-manual/index.zh-cn.html