iOS Dev Tips
AVPlayer 暂停继续播放
最近在开发一款视频直播的应用,其中有一个功能是进入后台暂停,再次进入前台后继续播放的问题,可以通过 Appdelegate 中处理这个问题,先上代码
- (void)applicationWillResignActive:(UIApplication *)application
{
   [player pause];
   pausedtime = player.currentTime
}
- (void)applicationDidBecomeActive:(UIApplication *)application
{
  [player seekToTime:pausedtime toleranceBefore:kCMTimeZero toleranceAfter:kCMTimeZero];
  [player play];
}
思路是
-
在进入后台,即将不活跃的时候,记录下当前时间,就是上面代码的 pausedtime,这里需要在 Appdelegate 里面定义一下 float *pausedtime
-
在 applicationWillResignActive 中获取当前暂停的时间
-
在 applicationDidBecomeActive 中续播
MD5 加密
-
新建 NSObject,命名为 MD5
-
头文件 MD5.h
#import <Foundation/Foundation.h> @interface MD5 : NSObject + (NSString*)md5:(NSString *)stringToEncrypt; @end -
主文件 MD5.m
#import "MD5.h" #import <CommonCrypto/CommonDigest.h> @implementation MD5 /* * @param stringToEncrypt 需要被加密的字符串 * @return md5加密后的32位字符串,小写结尾用lowercaseString,大写用uppercaseString */ + (NSString*)md5:(NSString *)stringToEncrypt { const char *cStr = [stringToEncrypt UTF8String]; unsigned char result[16]; CC_MD5(cStr, (CC_LONG)strlen(cStr), result ); return [[NSString stringWithFormat: @"%02X%02X%02X%02X%02X%02X%02X%02X%02X%02X%02X%02X%02X%02X%02X%02X", result[0], result[1], result[2], result[3], result[4], result[5], result[6], result[7], result[8], result[9], result[10], result[11], result[12], result[13], result[14], result[15] ] lowercaseString]; } @end -
使用方法
-
引入头部文件 MD5.h
-
需要加密处使用
[MD5 md5:待加密字符串]
-
其他信息
内容解释+ (NSString *)md5:(NSString *)stringToEncrypt;方法 stringToEncrypt 待加密字符串 lowercaseString/uppercaseString 返回字符串为小写/大写
iOS 中关闭键盘
iOS 中经常需要用到关闭键盘,基本有三种方式
-
[self.view endEditing:YES] -
[[UIApplication sharedApplication] sendAction:@selector(resignFirstResponser) to:nil from:nil forEvent:nil]; -
[[[UIApplication sharedApplication] keyWindow] endEditing:YES];
至于如何触发这些事件,看自己实际需求解决。
iPhone 分辨率
想想有点醉,某一个从事了四年 iOS 开发的人,居然至今连各代 iPhone 的分辨率都不知道,他也算是可以了。
官方链接:Screenshot specifications
Mac 下的应用
Icon 16px - 1024px,翻倍式。
iOS 开发之字体自定义
一天客户对我说:“*哥,你给我们做的这个应用,我们觉得字体不好看,能换个我们想要的字体么?”,同时递上了字体。
我说:“没问题!”,拿过新字体,开始工作。
重命名为 adai.ttf,直接拖入到项目资源中。
编辑 Info.plist 文件,添加 Fonts provided by application,Item 的值就是刚才我重命名的字体名字 adai.ttf。
然后调用方法 + (UIFont *)fontWithName:(NSString *)fontName size:(CGFloat)fontSize;,如 _lbTitle.font = [UIFont fontWithName:@"adai" size:20];
但是却不能正常显示,原来有时候字体名字并不是我重命名后的名字,咋办?
- (void)listAllFonts {
  NSArray *fontFamilies = [UIFont familyNames];
  for (NSString *fontFamily in fontFamilies) {
       NSArray *fontNames = [UIFont fontNamesForFamilyName:fontFamily];
       NSLog (@"%@: %@", fontFamily, fontNames);
  }
}
通过上面这段代码,列出字体名字,做了上面的修改,客户高兴的拿着修改字体后的应用回去了。
Swift 版本
查看字体
var i = 0
for family: String in UIFont.familyNames {
    print("\(i)---font---\(family)")
    for names: String in UIFont.fontNames(forFamilyName: family) {
        print("== \(names)")
    }
    i += 1
}
使用字体
let label = UILabel(frame: CGRect(x: 0, y: 0, width: 100, height: 100))
label.text = ""
let font = UIFont(name: "adai", size: 13)
if font != nil {
   label.font = font
}
隔了两三天,客户又来找:“*哥,我觉得新字体好看,但我们老板想看看其他几个字体,你能帮我多放几个字体进去么?”
我说:“你们真的麻烦,给你们弄个字体下载的吧。”,说完开工。
添加库 CoreText.framework 并引入文件 #import <CoreText/CoreText.h>
- (void)downloadFont
{
    NSString *URL_FONT = @"download_url/adai.otf";
    NSString *fontName = @"adai";
    NSData *dynamicFontData = [NSData dataWithContentsOfURL:[NSURL URLWithString:URL_FONT]];
    if (!dynamicFontData)
        return;
    CFErrorRef error;
    CGDataProviderRef providerRef = CGDataProviderCreateWithCFData((CFDataRef)dynamicFontData);
    CGFontRef font = CGFontCreateWithDataProvider(providerRef);
    if (! CTFontManagerRegisterGraphicsFont(font, &error))
    {
        CFStringRef errorDescription = CFErrorCopyDescription(error);
        NSLog(@"Failed to load font: %@", errorDescription);
        CFRelease(errorDescription);
    }
    else
        self.dynamicFontLabel.font = [UIFont fontWithName:fontName size:50];
    CFRelease(font);
    CFRelease(providerRef);
}
每次访问都要下载字体,那得多浪费流量,所以,又做了下判断,如果已经下载的就直接使用,没有下载的那就下载。
- (BOOL)hasFont:(NSString *)fontName
{
    UIFont* theFont = [UIFont fontWithName:fontName size:13.0];
    BOOL downloaded = (theFont && ([theFont.fontName compare:fontName] == NSOrderedSame || [theFont.familyName compare:fontName] == NSOrderedSame));
    return downloaded;
}
搞定,客户拿走了新应用。
ps. iOS 中自带的字体
0---项目字体---Devanagari Sangam MN
== DevanagariSangamMN
== DevanagariSangamMN-Bold
1---项目字体---Avenir Next
== AvenirNext-Medium
== AvenirNext-DemiBoldItalic
== AvenirNext-DemiBold
== AvenirNext-HeavyItalic
== AvenirNext-Regular
== AvenirNext-Italic
== AvenirNext-MediumItalic
== AvenirNext-UltraLightItalic
== AvenirNext-BoldItalic
== AvenirNext-Heavy
== AvenirNext-Bold
== AvenirNext-UltraLight
2---项目字体---Kohinoor Devanagari
== KohinoorDevanagari-Regular
== KohinoorDevanagari-Light
== KohinoorDevanagari-Semibold
3---项目字体---Times New Roman
== TimesNewRomanPS-ItalicMT
== TimesNewRomanPS-BoldItalicMT
== TimesNewRomanPS-BoldMT
== TimesNewRomanPSMT
4---项目字体---Gill Sans
== GillSans-Italic
== GillSans-SemiBold
== GillSans-UltraBold
== GillSans-Light
== GillSans-Bold
== GillSans
== GillSans-SemiBoldItalic
== GillSans-BoldItalic
== GillSans-LightItalic
5---项目字体---Kailasa
== Kailasa-Bold
== Kailasa
6---项目字体---Bradley Hand
== BradleyHandITCTT-Bold
7---项目字体---PingFang HK
== PingFangHK-Medium
== PingFangHK-Thin
== PingFangHK-Regular
== PingFangHK-Ultralight
== PingFangHK-Semibold
== PingFangHK-Light
8---项目字体---Savoye LET
== SavoyeLetPlain
9---项目字体---Odin Rounded
== Odin-Bold
10---项目字体---Trebuchet MS
== TrebuchetMS-Bold
== TrebuchetMS-Italic
== Trebuchet-BoldItalic
== TrebuchetMS
11---项目字体---Baskerville
== Baskerville-SemiBoldItalic
== Baskerville-SemiBold
== Baskerville-BoldItalic
== Baskerville
== Baskerville-Bold
== Baskerville-Italic
12---项目字体---Futura
== Futura-CondensedExtraBold
== Futura-Medium
== Futura-Bold
== Futura-CondensedMedium
== Futura-MediumItalic
13---项目字体---Arial Hebrew
== ArialHebrew-Bold
== ArialHebrew-Light
== ArialHebrew
14---项目字体---Bodoni 72
== BodoniSvtyTwoITCTT-Bold
== BodoniSvtyTwoITCTT-BookIta
== BodoniSvtyTwoITCTT-Book
15---项目字体---Hoefler Text
== HoeflerText-Italic
== HoeflerText-Black
== HoeflerText-Regular
== HoeflerText-BlackItalic
16---项目字体---Optima
== Optima-ExtraBlack
== Optima-BoldItalic
== Optima-Italic
== Optima-Regular
== Optima-Bold
17---项目字体---Futura MdCn BT
== FuturaBT-MediumCondensed
18---项目字体---DIN Condensed
== DINCondensed-Bold
19---项目字体---Noto Nastaliq Urdu
== NotoNastaliqUrdu
20---项目字体---Charter
== Charter-BlackItalic
== Charter-Bold
== Charter-Roman
== Charter-Black
== Charter-BoldItalic
== Charter-Italic
21---项目字体---Heiti TC
22---项目字体---Geeza Pro
== GeezaPro-Bold
== GeezaPro
23---项目字体---Bodoni Ornaments
== BodoniOrnamentsITCTT
24---项目字体---Kohinoor Telugu
== KohinoorTelugu-Regular
== KohinoorTelugu-Medium
== KohinoorTelugu-Light
25---项目字体---Helvetica Neue
== HelveticaNeue-UltraLightItalic
== HelveticaNeue-Medium
== HelveticaNeue-MediumItalic
== HelveticaNeue-UltraLight
== HelveticaNeue-Italic
== HelveticaNeue-Light
== HelveticaNeue-ThinItalic
== HelveticaNeue-LightItalic
== HelveticaNeue-Bold
== HelveticaNeue-Thin
== HelveticaNeue-CondensedBlack
== HelveticaNeue
== HelveticaNeue-CondensedBold
== HelveticaNeue-BoldItalic
26---项目字体---Party LET
== PartyLetPlain
27---项目字体---Symbol
== Symbol
28---项目字体---Bangla Sangam MN
29---项目字体---Hiragino Sans
== HiraginoSans-W3
== HiraginoSans-W6
30---项目字体---Hiragino Maru Gothic ProN
== HiraMaruProN-W4
31---项目字体---Cochin
== Cochin-Italic
== Cochin-Bold
== Cochin
== Cochin-BoldItalic
32---项目字体---Euphemia UCAS
== EuphemiaUCAS
== EuphemiaUCAS-Italic
== EuphemiaUCAS-Bold
33---项目字体---Academy Engraved LET
== AcademyEngravedLetPlain
34---项目字体---Helvetica
== Helvetica-Oblique
== Helvetica-BoldOblique
== Helvetica
== Helvetica-Light
== Helvetica-Bold
== Helvetica-LightOblique
35---项目字体---American Typewriter
== AmericanTypewriter-CondensedBold
== AmericanTypewriter-Condensed
== AmericanTypewriter-CondensedLight
== AmericanTypewriter
== AmericanTypewriter-Bold
== AmericanTypewriter-Semibold
== AmericanTypewriter-Light
36---项目字体---Didot
== Didot-Bold
== Didot
== Didot-Italic
37---项目字体---Courier New
== CourierNewPS-ItalicMT
== CourierNewPSMT
== CourierNewPS-BoldItalicMT
== CourierNewPS-BoldMT
38---项目字体---Courier
== Courier-BoldOblique
== Courier-Oblique
== Courier
== Courier-Bold
39---项目字体---Rockwell
== Rockwell-Italic
== Rockwell-Regular
== Rockwell-Bold
Xcode 项目工程的结构
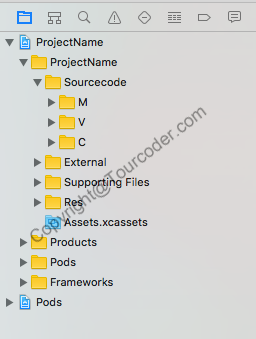
这是我常用的项目工程结构,其中包含了 Pods.
ProjectName/
    Sourcecode 代码
        /M 模型
        /V 视图
        /C  控制器
    External   第三方引用,不管是自己写的类库和其它公司的都称第三方
    Supporting Files 默认的一些文件放在这里,比如 main.m Appdelegate.h/m Info.plist
    Res  图形素材
    Assets.xcassets
    Products
    Pods
    Frameworks
Pods
有时候项目小,不会使用 MVC 分开,那么就会用 Section 的方式,只要变更 Sourcecode里面的内容即可
Sourcecode 代码
  /Section1 板块1
  /Section2 板块2
iOS 中传值的问题
在 iOS 开发中,两界面之间的传值是常有的事情,传值的方式也有很多,比如 NSUserDefaults,再比如代理传值。
这里简单介绍下用代理传值
-
开发语言 Objective-C
-
需求说明 创建两个 ViewController,分别叫着 ViewController 和 SecondView,实现把 SecondView 里面一个 TextField 的值传到 ViewController 里的 Label 中。
-
步骤和主要代码
-
创建两个 ViewController,并且分别按需求命名
ViewController 的头文件代码如下
//引入 SecondView
#import "SecondView.h"
@interface ViewController :UIViewController<SecondViewDelegate>
//接受传值的 label
@property (nonatomic, retain) UILabel *lbValue;
@property (nonatomic, retain) UIButton *btnClick;
@end
ViewController 的 m 文件代码如下
@implementation ViewController

- (void)viewDidLoad {
    [super viewDidLoad];
    self.view.backgroundColor = [UIColor whiteColor];

    _lbValue = [[UILabel alloc] initWithFrame:CGRectMake(0, 50, self.view.frame.size.width, 30)];
    _lbValue.textColor = [UIColor blackColor];
    _lbValue.textAlignment = NSTextAlignmentCenter;
    _lbValue.text = @"Defult Text";
    [self.view addSubview:_lbValue];


    _btnClick = [[UIButton alloc] initWithFrame:CGRectMake(10, 100, self.view.frame.size.width - 20, 44)];
    [_btnClick setBackgroundColor:[UIColor blackColor]];
    [_btnClick addTarget:self action:@selector(actionClick) forControlEvents:UIControlEventTouchUpInside];
    [_btnClick setTitle:@"Go to Second" forState:UIControlStateNormal];
    [_btnClick setTitleColor:[UIColor whiteColor] forState:UIControlStateNormal];
    [self.view addSubview:_btnClick];

}

\- (void)actionClick {
    SecondView *nextView = [[SecondView alloc] init];
    // 设置代理到 nextView
    nextView.delegate = self;
    [self presentViewController:nextView animated:YES completion:nil];
}

\- (void)passValue:(NSString *)value{
    // 改变 label 的值
    _lbValue.text = value;
}

- (void)didReceiveMemoryWarning {
    [super didReceiveMemoryWarning];
    // Dispose of any resources that can be recreated.
}

@end
SecondView.h 的部分代码
#import <UIKit/UIKit.h>
// 定义代理协议,实现传值代理
@protocol SecondViewDelegate <NSObject>
// 必须实现的用来传值的协议方法,
- (void)passValue:(NSString *)value;
@end
@interface SecondView : UIViewController
// 此处利用协议来定义代理
@property (nonatomic, unsafe_unretained) id<SecondViewDelegate> delegate;
@property (nonatomic, retain) UITextField *tfValue;
@property (nonatomic, retain) UIButton *btnPass;
@end
SecondView.m 的部分代码
- (void)viewDidLoad {
    [super viewDidLoad];
    // Do any additional setup after loading the view, typically from a nib.
    self.view.backgroundColor = [UIColor whiteColor];

    _tfValue = [[UITextField alloc] initWithFrame:CGRectMake(0, 50, self.view.frame.size.width, 30)];
    _tfValue.textColor = [UIColor blackColor];
    _tfValue.textAlignment = NSTextAlignmentCenter;
    [self.view addSubview:_tfValue];

    _btnPass = [[UIButton alloc] initWithFrame:CGRectMake(10, 100, self.view.frame.size.width - 20, 44)];
    [_btnPass setBackgroundColor:[UIColor blackColor]];
    [_btnPass addTarget:self action:@selector(actionClick) forControlEvents:UIControlEventTouchUpInside];
    [_btnPass setTitle:@"Pass" forState:UIControlStateNormal];
    [_btnPass setTitleColor:[UIColor whiteColor] forState:UIControlStateNormal];
    [self.view addSubview:_btnPass];

}

- (void)actionClick {
    // 通过代理传值
    [self.delegate passValue:_tfValue.text];
    [self dismissViewControllerAnimated:YES completion:nil];
}
这里基本就是代理传值的实现方式。
-
Url Scheme 使 APP 互相跳转及查看方法
在 iOS 开发中,Url Scheme 使得 app 之间相互跳转变得非常容易。
首先我们需要判断系统中是否安装了待跳转的 app,比如跳转到微信
if ([[UIApplication sharedApplication] canOpenURL:[NSURL  URLWithString:@"wexin://"]]){
    NSLog(@"已经安装");
}
else{
    NSLog(@"未安装");
}
如果安装了,则执行
[[UIApplication sharedApplication] openURL:[NSURL URLWithString:@"weixin://"]];
这样就可以打开微信,那么是怎么知道这里的 wexin:// 即 Url Scheme 的呢?
-
在电脑上用 iTunes 下载你要跳转的 app
-
进入到这个 app 所在的文件夹,找到这个文件,应该是一个 .ipa 结尾的文件
-
将 .ipa 改成可解压的格式并解压,比如 .zip,不过现在有些压缩软件也可以直接解压 .ipa
-
在 Payload 文件夹中会有一个文件,右键这个文件,选择所弹出菜单上的显示包内容选项
-
找到 Info.plist 文件,并打开,找到 CFBundleURLSchemes 中的 Url Scheme 即可。记得是本 app 的 Url Scheme,可以对照 URL identifier 找到。
更多使用说明,可以去看 Apple Developer Documents。
iOS 版本升级的提醒功能
虽然 Apple 禁止在 App 中提示升级,而且所有在 App 内部提示升级的 App 都无法通过审核,所以绕过审核人员就是这个功能的重点。
-
远程开启
实现方式是在服务器端设置一个开关,审核人员在审核 App 的时候,通过服务器关闭了版本升级的提醒功能,但上线后开启。
-
APP 内部实现
实现方式是获取当前测试版本的和当前 Binary 的版本做配对,相同的不提示,不同的则提示。
-
第三方插件
目前有不少第三方插件完成了这个功能。
需要注意的是,这是违背开发者标准的,所以,这里我只是说明下思路,具体实现自行解决。
iOS 中拍照
拍照功能是应用中常有的,下面介绍两个拍照方式
-
UIImagepickerController
调用摄像头,再次之前需要设置对应的两个代理 UIImagePickerControllerDelegate 和 UINavigationControllerDelegate 以及初始化
@property (nonatomic, retain) UIImagePickerController *imagePickerController;UIImagePickerControllerSourceType sourceType = UIImagePickerControllerSourceTypeCamera; //Determine has a camera, choose from photo library if no. if(![UIImagePickerController isSourceTypeAvailable:sourceType]) { sourceType = UIImagePickerControllerSourceTypePhotoLibrary; } _imagePickerController = [[UIImagePickerController alloc] init]; _imagePickerController.delegate = self; _imagePickerController.sourceType = sourceType; _imagePickerController.allowsEditing = YES; //Edit _imagePickerController.showsCameraControls = YES; [self presentViewController:_imagePickerController animated:NO completion:nil]; UIImagePickerControllerSourceTypeCamera 有三个方法 UIImagePickerControllerSourceTypePhotoLibrary //从图库中选择 UIImagePickerControllerSourceTypeSavedPhotosAlbum //从相册中选择 UIImagePickerControllerSourceTypeCamera //直接调用摄像头拍照当用户做完成操作后的处理
- (void)imagePickerController:(UIImagePickerController *)picker didFinishPickingMediaWithInfo:(NSDictionary *)info {
    //From the editdimage:UIImagePickerControllerEditedImage, from the original image:UIImagePickerControllerOriginalImage
    UIImage *image= [info objectForKey:@"UIImagePickerControllerEditedImage"];
    if (picker.sourceType == UIImagePickerControllerSourceTypeCamera) {
        //Save to album
        UIImageWriteToSavedPhotosAlbum(image, nil, nil, nil);
    }
    //More codes
}
这里的 info 是一个字典类型
UIKIT_EXTERN NSString *const UIImagePickerControllerMediaType __TVOS_PROHIBITED //媒体类型
UIKIT_EXTERN NSString *const UIImagePickerControllerOriginalImage __TVOS_PROHIBITED //原始图片
UIKIT_EXTERN NSString *const UIImagePickerControllerReferenceURL NS_AVAILABLE_IOS(4_1) __TVOS_PROHIBITED //原件的 URL
UIKIT_EXTERN NSString *const UIImagePickerControllerEditedImage __TVOS_PROHIBITED //修改后的图片
UIKIT_EXTERN NSString *const UIImagePickerControllerCropRect __TVOS_PROHIBITED //裁剪尺寸
UIKIT_EXTERN NSString *const UIImagePickerControllerMediaURL __TVOS_PROHIBITED //媒体的 URL
UIKIT_EXTERN NSString *const UIImagePickerControllerMediaMetadata NS_AVAILABLE_IOS(4_1) __TVOS_PROHIBITED //如果是拍照的照片,则需要手动保存到本地,系统不会自动保存拍照成功后的照片
在拍照过程中,用户还有可能有取消的操作,那么需要用方法
- (void)imagePickerControllerDidCancel:(UIImagePickerController *)picker。 -
AVFoundation
用 AVFoundation 做拍照功能,常是为了自定义拍照的 UI,这里需要说明一下 UIImagepickerController 也可以自定义拍照的 UI。
头文件中引入
#import <AVFoundation/AVFoundation.h>,并且初始化@property (nonatomic, strong) AVCaptureDevice *device; //AVCaptureDeviceInput 代表输入设备,他使用AVCaptureDevice 来初始化 @property (nonatomic, strong) AVCaptureDeviceInput *input; //输出图片 @property (nonatomic, strong) AVCaptureStillImageOutput *imageOutput; //session:由他把输入输出结合在一起,并开始启动捕获设备(摄像头) @property (nonatomic, strong) AVCaptureSession *session; //图像预览层,实时显示捕获的图像 @property (nonatomic, strong) AVCaptureVideoPreviewLayer *previewLayer;示例代码
- (void)viewDidLoad {
    [self cameraDistrict];
}
- (void)cameraDistrict {
    self.device = [self cameraWithPosition:AVCaptureDevicePositionFront]; // AVCaptureDevicePositionBack  后置摄像头 AVCaptureDevicePositionFront 前置摄像头
    self.input = [[AVCaptureDeviceInput alloc] initWithDevice:self.device error:nil];
    self.imageOutput = [[AVCaptureStillImageOutput alloc] init];
    self.session = [[AVCaptureSession alloc] init];
    self.session.sessionPreset = AVCaptureSessionPreset640x480; // 自定义获取的图片的大小 AVCaptureSessionPreset320x240 AVCaptureSessionPreset352x288 AVCaptureSessionPreset640x480 AVCaptureSessionPreset960x540 AVCaptureSessionPreset1280x720 AVCaptureSessionPreset1920x1080 AVCaptureSessionPreset3840x2160
    //输入输出设备结合
    if ([self.session canAddInput:self.input]) {
        [self.session addInput:self.input];
    }
    if ([self.session canAddOutput:self.imageOutput]) {
        [self.session addOutput:self.imageOutput];
    }
    //预览层的生成
    self.previewLayer = [[AVCaptureVideoPreviewLayer alloc] initWithSession:self.session];
    self.previewLayer.frame = CGRectMake(0, 64, self.view.frame.size.width, self.view.frame.size.height-64);
    self.previewLayer.videoGravity = AVLayerVideoGravityResizeAspectFill;
    [self.view.layer addSublayer:self.previewLayer];
    //设备取景开始
    [self.session startRunning];
    if ([_device lockForConfiguration:nil]) {
        //自动闪光灯,
        if ([_device isFlashModeSupported:AVCaptureFlashModeAuto]) {
            [_device setFlashMode:AVCaptureFlashModeAuto];
        }
        [_device unlockForConfiguration];
    }

}

- (AVCaptureDevice *)cameraWithPosition:(AVCaptureDevicePosition)position{
    NSArray *devices = [AVCaptureDevice devicesWithMediaType:AVMediaTypeVideo];
    for ( AVCaptureDevice *device in devices )
        if ( device.position == position ){
            return device;
        }
    return nil;
}

- (void)takePhotos {
    AVCaptureConnection *conntion = [self.imageOutput connectionWithMediaType:AVMediaTypeVideo];
    if (!conntion) {
        //提示操作
        return;
    }
   [self.imageOutput captureStillImageAsynchronouslyFromConnection:conntion completionHandler:^(CMSampleBufferRef imageDataSampleBuffer, NSError *error) {
        if (imageDataSampleBuffer == nil) {
            return ;
        }
         _imgData = [AVCaptureStillImageOutput jpegStillImageNSDataRepresentation:imageDataSampleBuffer];
        [self.session stopRunning];
    }];
}
总体来说,上面代码停容易理解的,就不一一解释了。
AFNetworking Post 复杂的 Json
AFNetworking 是 iOS 下一个非常好用的类库,一般它在做 POST 请求的时候,单一 Json 格式较多,如下
NSDictionary *params = @{@"key0":"value0", @"key1":"value1", @"key2":"value2"};
[manager POST:URL_REQUEST parameters:params success:^(NSURLSessionDataTask * _Nonnull task, id  _Nonnull responseObject) {

} failure:^(NSURLSessionDataTask * _Nullable task, NSError * _Nonnull error) {

}];
但有时候在 Json 会相对复杂点,比如
{
    "key0":"value0",
    "keys":[
        {
            "key1":"value1",
            "key2":"value2"
        },
        {
            "key1":"value1",
            "key2":"value2"
        },
        {
            "key1":"value1",
            "key2":"value2"
        },
        {
            "key1":"value1",
            "key2":"value2"
        }
    ]
}
这时候就需要构造这部分参数,最简单的方法,循环
NSMutableArray *paramArrays = [NSMutableArray array];
for (int i = 0; i < _keycontent.count ; i++ ) {
    GCShoppingCartProductModel *model = _keycontent[i];
    NSDictionary *temp = @{@"key1":"value1",@"key2":"value2"};

    [paramArrays addObject:temp];
}
NSDictionary *params = @{@"key0":"value0",@"keys":paramArrays};
至于其他请求部分还是一样。
根据经纬度计算距离
-
手动计算
#define PI 3.1415926 +(double) LantitudeLongitudeDist:(double)lon1 other_Lat:(double)lat1 self_Lon:(double)lon2 self_Lat:(double)lat2{ double er = 6378137; // 6378700.0f; //ave. radius = 6371.315 (someone said more accurate is 6366.707) //equatorial radius = 6378.388 //nautical mile = 1.15078 double radlat1 = PI*lat1/180.0f; double radlat2 = PI*lat2/180.0f; //now long. double radlong1 = PI*lon1/180.0f; double radlong2 = PI*lon2/180.0f; if( radlat1 < 0 ) radlat1 = PI/2 + fabs(radlat1);// south if( radlat1 > 0 ) radlat1 = PI/2 - fabs(radlat1);// north if( radlong1 < 0 ) radlong1 = PI*2 - fabs(radlong1);//west if( radlat2 < 0 ) radlat2 = PI/2 + fabs(radlat2);// south if( radlat2 > 0 ) radlat2 = PI/2 - fabs(radlat2);// north if( radlong2 < 0 ) radlong2 = PI*2 - fabs(radlong2);// west //spherical coordinates x=r*cos(ag)sin(at), y=r*sin(ag)*sin(at), z=r*cos(at) //zero ag is up so reverse lat double x1 = er * cos(radlong1) * sin(radlat1); double y1 = er * sin(radlong1) * sin(radlat1); double z1 = er * cos(radlat1); double x2 = er * cos(radlong2) * sin(radlat2); double y2 = er * sin(radlong2) * sin(radlat2); double z2 = er * cos(radlat2); double d = sqrt((x1-x2)*(x1-x2)+(y1-y2)*(y1-y2)+(z1-z2)*(z1-z2)); //side, side, side, law of cosines and arccos double theta = acos((er*er+er*er-d*d)/(2*er*er)); double dist = theta*er; return dist; } -
iOS自带
CLLocation *orig=[[[CLLocation alloc] initWithLatitude:[mainDelegate.latitude_self doubleValue]  longitude:[mainDelegate.longitude_self doubleValue]] autorelease];
    CLLocation* dist=[[[CLLocation alloc] initWithLatitude:[tmpNewsModel.latitude doubleValue] longitude:[tmpNewsModel.longitude doubleValue] ] autorelease];

    CLLocationDistance kilometers=[orig distanceFromLocation:dist]/1000;
NSLog(@"距离:",kilometers);
Label 上文字显示不一样
// 创建Attributed
NSMutableAttributedString *noteStr = [[NSMutableAttributedString alloc] initWithString:_label.text];
// 需要改变的第一个文字的位置
NSUInteger firstLoc = [[noteStr string] rangeOfString:@"金"].location + 1;
// 需要改变的最后一个文字的位置
NSUInteger secondLoc = [[noteStr string] rangeOfString:@"元"].location;
// 需要改变的区间
NSRange range = NSMakeRange(firstLoc, secondLoc - firstLoc);
// 改变颜色
[noteStr addAttribute:NSForegroundColorAttributeName value:[UIColor greenColor] range:range];
// 改变字体大小及类型
[noteStr addAttribute:NSFontAttributeName value:[UIFont fontWithName:@"Helvetica-BoldOblique" size:27] range:range];
// 为label添加Attributed
[_label setAttributedText:noteStr];
iOS 判断 uiscrollview 是向上滚动
- (void)scrollViewDidScroll:(UIScrollView *)scrollView

{

    int currentPostion = scrollView.contentOffset.y;

    if (currentPostion - _lastPosition > 20  && currentPostion > 0) {

        _lastPosition = currentPostion;

        NSLog(@"ScrollUp now");

        [self hideTabBar:YES];

        [self.navigationController setNavigationBarHidden:YES animated:YES];

    }

    else if ((_lastPosition - currentPostion > 20) && (currentPostion  <= scrollView.contentSize.height-scrollView.bounds.size.height-20) )

    {

        _lastPosition = currentPostion;

        NSLog(@"ScrollDown now");

       [self hideTabBar:NO];

        [self.navigationController setNavigationBarHidden:NO animated:YES];

    }
}
倒计时
-
NStimer
secondsCountDown = 60; countDownTimer = [NSTimer scheduledTimerWithTimeInterval:1 target:self selector:@selector(timeFireMethod) userInfo:nil repeats:YES]; -(void)timeFireMethod{ secondsCountDown--; if(secondsCountDown==0){ [countDownTimer invalidate]; } } -
GCD
__block int timeout=300; //倒计时时间
dispatch_queue_t queue = dispatch_get_global_queue(DISPATCH_QUEUE_PRIORITY_DEFAULT, 0);
dispatch_source_t _timer = dispatch_source_create(DISPATCH_SOURCE_TYPE_TIMER, 0, 0,queue);
dispatch_source_set_timer(_timer,dispatch_walltime(NULL, 0),1.0*NSEC_PER_SEC, 0); //每秒执行
dispatch_source_set_event_handler(_timer, ^{
    if(timeout<=0){ //倒计时结束,关闭
        dispatch_source_cancel(_timer);
        dispatch_release(_timer);
        dispatch_async(dispatch_get_main_queue(), ^{
    //设置界面的按钮显示 根据自己需求设置
            。。。。。。。。
        });
    }else{
        int minutes = timeout / 60;
        int seconds = timeout % 60;
        NSString *strTime = [NSString stringWithFormat:@"%d分%.2d秒后重新获取验证码",minutes, seconds];
        dispatch_async(dispatch_get_main_queue(), ^{
            //设置界面的按钮显示 根据自己需求设置
    。。。。。。。。
        });
        timeout--;

    }
});
dispatch_resume(_timer);
iOS 上为 app 设置字体大小
iOS 上为 app 设置字体大小 https://www.theverge.com/22580423/ios-15-iphone-text-size-how-to-control-center
苹果的开发者资源
苹果的开发者资源,还是弄得挺好的 https://developer.apple.com/design/resources/
iPad Pro 连接键盘和鼠标之后出现蓝色的框问题
这个问题的确是很烦人的,https://discussionschinese.apple.com/thread/251581565.
> 可在 Twitter/X 上评论该篇文章